
Merge Your Patterns Across Selling Channels
If you sell the same pattern on multiple selling channels (Ravelry, Etsy, FYBE, your own website, etc.), they will appear on GoSadi as separate and individual patterns when you first import them. This is because each selling channel treats your pattern as unique to them. GoSadi, therefore, imports each pattern according to the selling channel’s unique pattern ID. Rather than having duplicate patterns (one per selling channel) in your GoSadi Product Library, you can merge them into one product to manage everything in one place. This saves time and keeps your pattern details consistent across all channels.
What is Pattern Merging?
Pattern merging combines multiple listings of the same pattern across different selling channels into one product in GoSadi. This lets you:
Manage one pattern across all selling channels from one location (GoSadi)
Keep consistent details, pricing, and files across channels
Resolve conflicts (like different titles, descriptions, or publication dates) in one place
Share one product link that routes customers to all available versions
Select the Listings to Merge
1. Go to Product Library
2. Find pattern you want to merge (same pattern on different channels) by searching for its name or scroll to it
3. Click the checkbox to the left of each pattern name you want to merge
4. Click the Merge These Products button
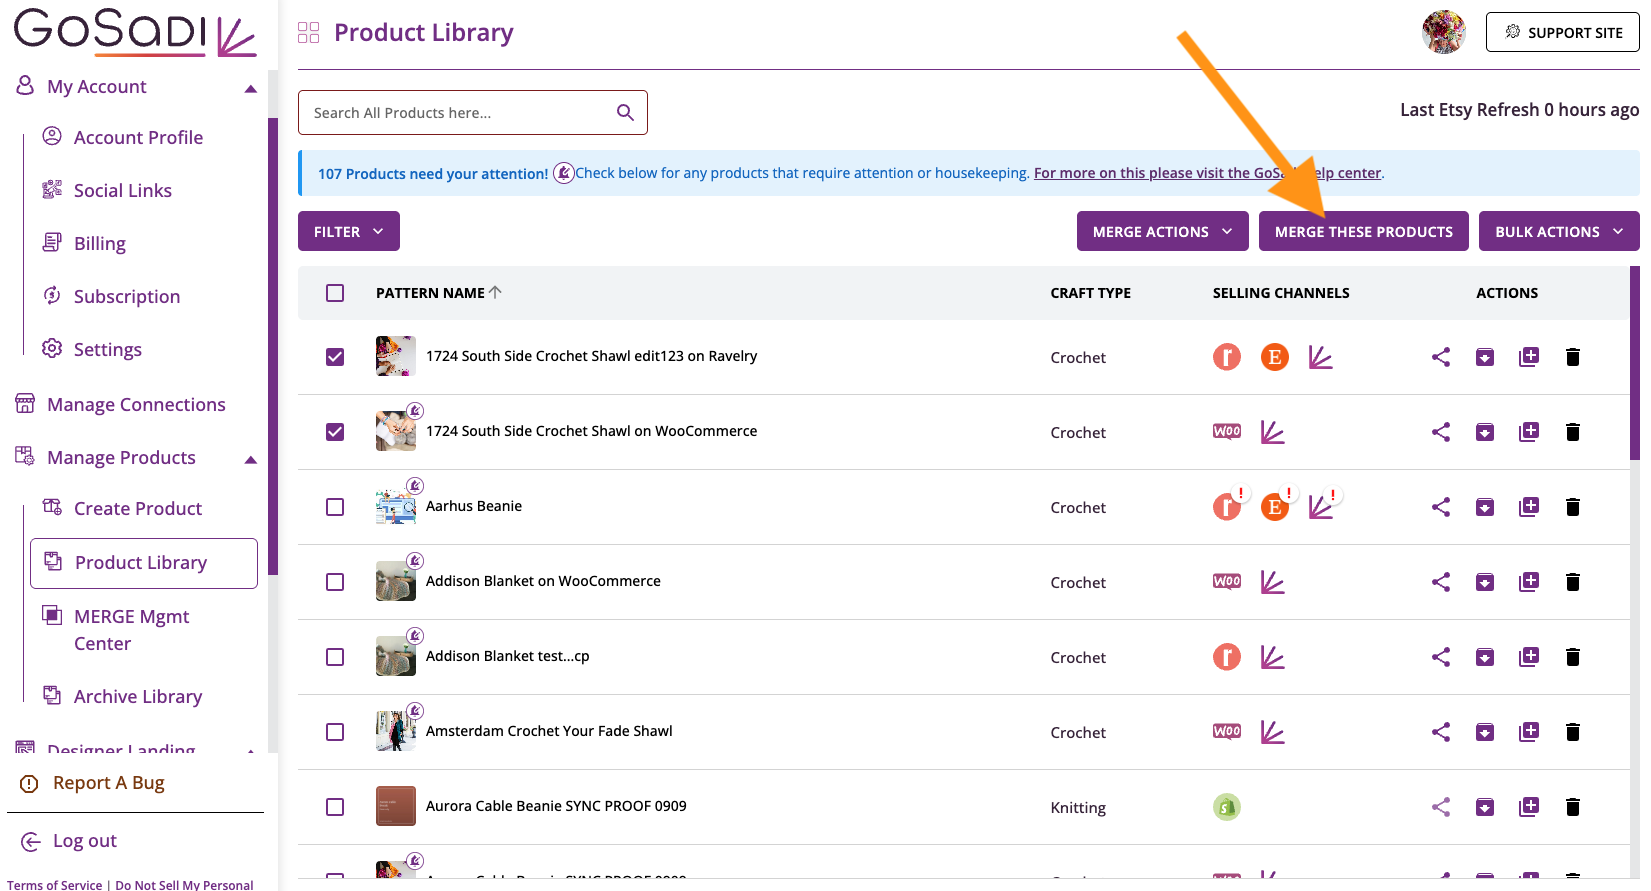
NOTE: This feature is great if you're selling patterns on multiple selling channels and also have a free version on your blog (or elsewhere).
Resolve Conflicts
During the merge, GoSadi shows you any conflicts between the versions on each Selling Channel. Common conflicts include:
Title (different names across channels)
Publish date (different dates)
Description for the DLP
For each conflict, decide which version you want to use. Ravelry is a good source of truth, so its information is a reliable choice when you’re deciding between versions.
NOTE: The version you pick will be the one that appears on your GoSadi DLP. You’ll have the chance to update pattern information per selling channel on each Selling Channel tab before finalizing the merge.
1. Review the conflicting information
2. Select the version you prefer
3. Move to the next conflict
4. Continue until all conflicts are resolved
IMPORTANT: GoSadi only shows you conflicts, not all information. You'll see only the items that need your attention.
Review the Merged Details
Preview the product and check:
Categories
Nitty Gritty (needle size, yarn, yardage, and gauge)
Attributes (importing from Etsy can bring in attributes that don’t belong, so check them and remove the ones that don’t apply)
Language
Any text that was pulled in from the original listings
The free version link, if you offer a free version
IMPORTANT: Check the attributes carefully. Some attributes imported from Etsy may not be correct for your pattern.
Clean Up Your Photos
Each photo in the Photo Gallery shows which selling channels use it, so you can clean up and de-duplicate as you go.
These are some helpful tips you can use when deciding the best photos for a listing.
Use Etsy photos as your primary photos (they have the highest resolution)
Remove non-Etsy duplicate photos
Add the Etsy photos to your other selling channels when you reach the Selling Channels tab
This ensures quality consistency while keeping one master set of images.
1. Open the Photo Gallery
2. Remove any duplicate photos
3. Keep the photos you want to use across your selling channels
Consolidate Your Files
When merging, if you notice multiple PDF pattern files, you'll want to consolidate them to one.
BEST PRACTICE: Use one master file, that is not your Etsy file, across all selling channels. Do not use different files for different channels.
1. Open the File Library
2. Check the files to see which selling channels use each file
3. Keep one, non-Etsy, master file and remove duplicate files
4. Use the same file for all selling channels
IMPORTANT: At least one file is required for Etsy. Make sure your master file is attached to Etsy before you merge.
NOTE: Consolidating to one file is optional, but it’s highly recommended for consistency.
Finish Cleanup in Each Selling Channel
In your clean-up and consolidation, you’ve removed some photos and files from individual Selling Channel tabs, so you’ll need to review each Selling Channel tab and make sure the photos and files from Photo Gallery and File Library are added back to the Selling Channel. Check each Selling Channel tab before you merge.
1. Go to the Selling Channels tab
2. One-by-one check each of your Selling Channels tabs at the top of the page to make sure you’ve included images, files, pricing, descriptions, etc. on each of them, paying especially close attention to Photos and Files.
a. DLP (Designer Landing Page)
Confirm everything looks correct
If you have a free version, add its link to the text box at the top of the page
b. Ravelry
Confirm the photos and file are attached
c. Etsy
Confirm the photos and file are attached
d. Shopify
Add photos and the file if they were removed
e. Any other connected channels
Add photos and the file if they were removed
NOTE: Removing a photo or file from one channel can leave that channel without it. Check each channel before you merge.
Sync Your Merged Product
1. Click the Merge Actions button either at the top or the bottom of the page
2. Click Confirm Merge
3. Wait for the sync to finish. Depending on how much data needs to sync, this can take a few seconds. Ravelry usually takes the longest.
4. You will see the success message in the upper-right corner of the screen for each Selling Channel
After the Merge
Once merged, you have one product to manage.
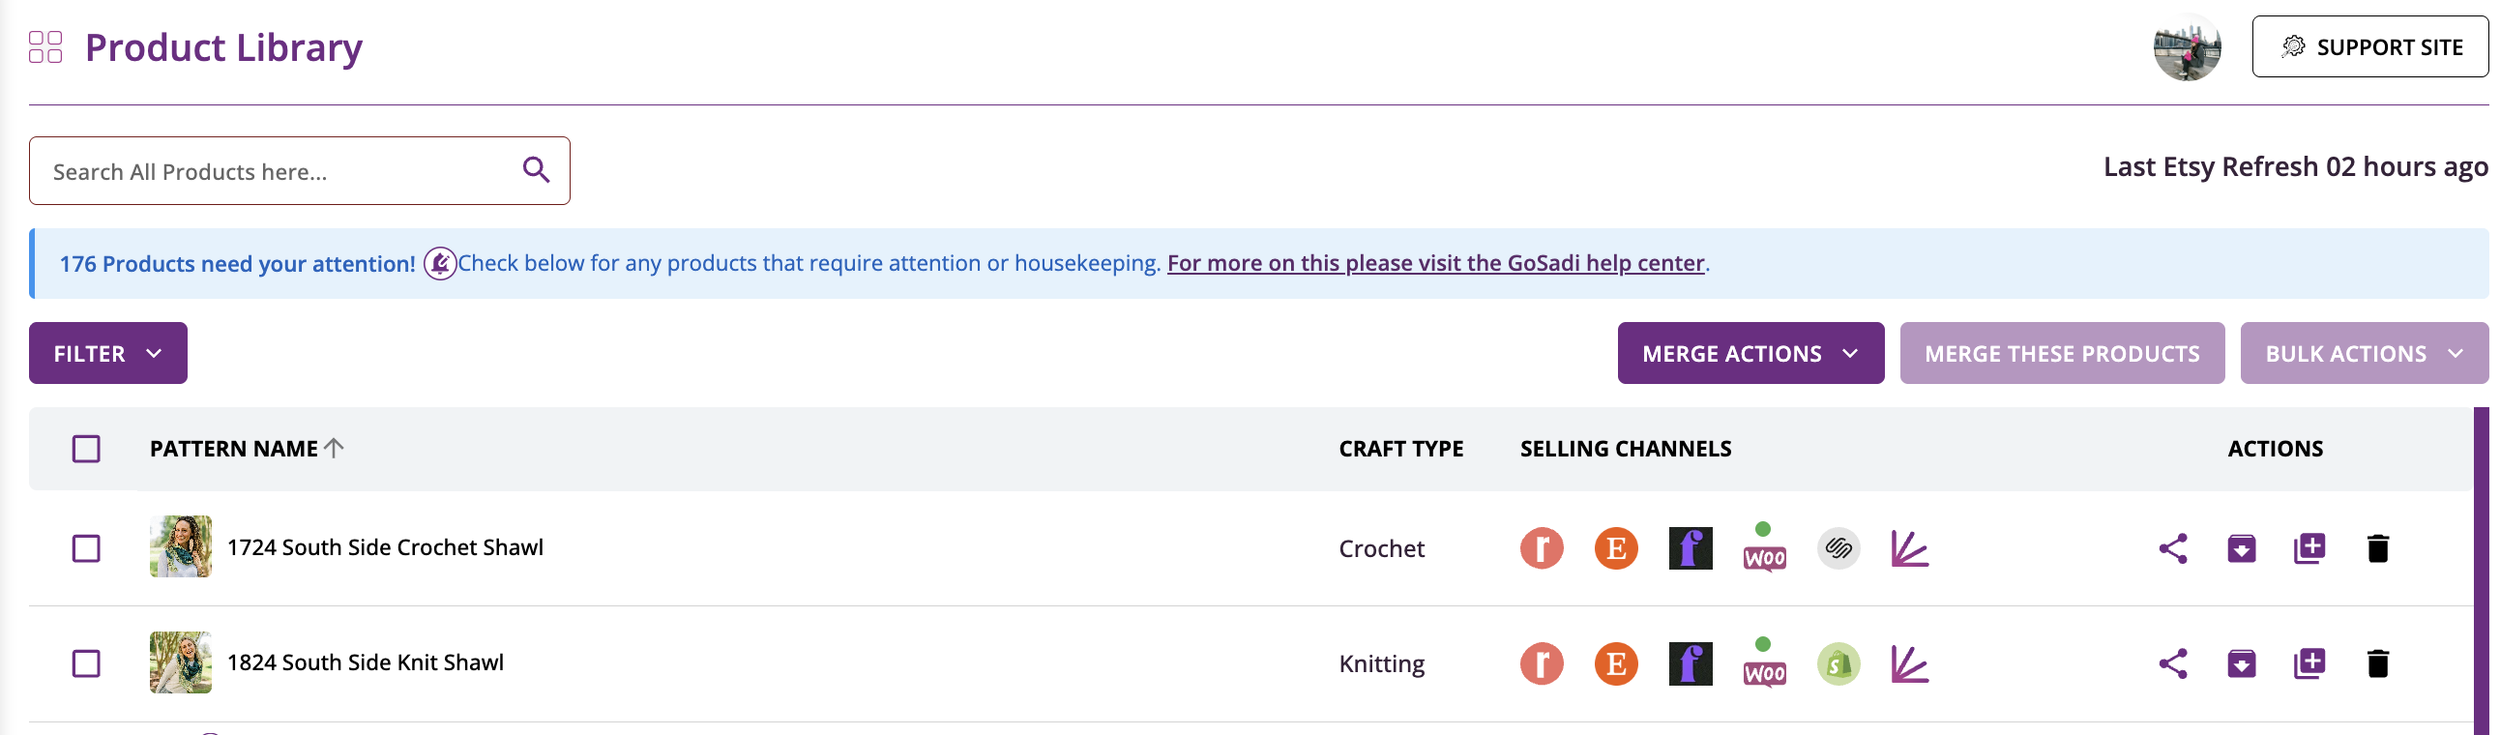
1. Go to Product Library
2. Find your merged pattern
3. Notice that all Selling Channel icons are in the Selling Channels column
4. Click on the pattern to see that all selling channels appear in one place on your Pattern Page
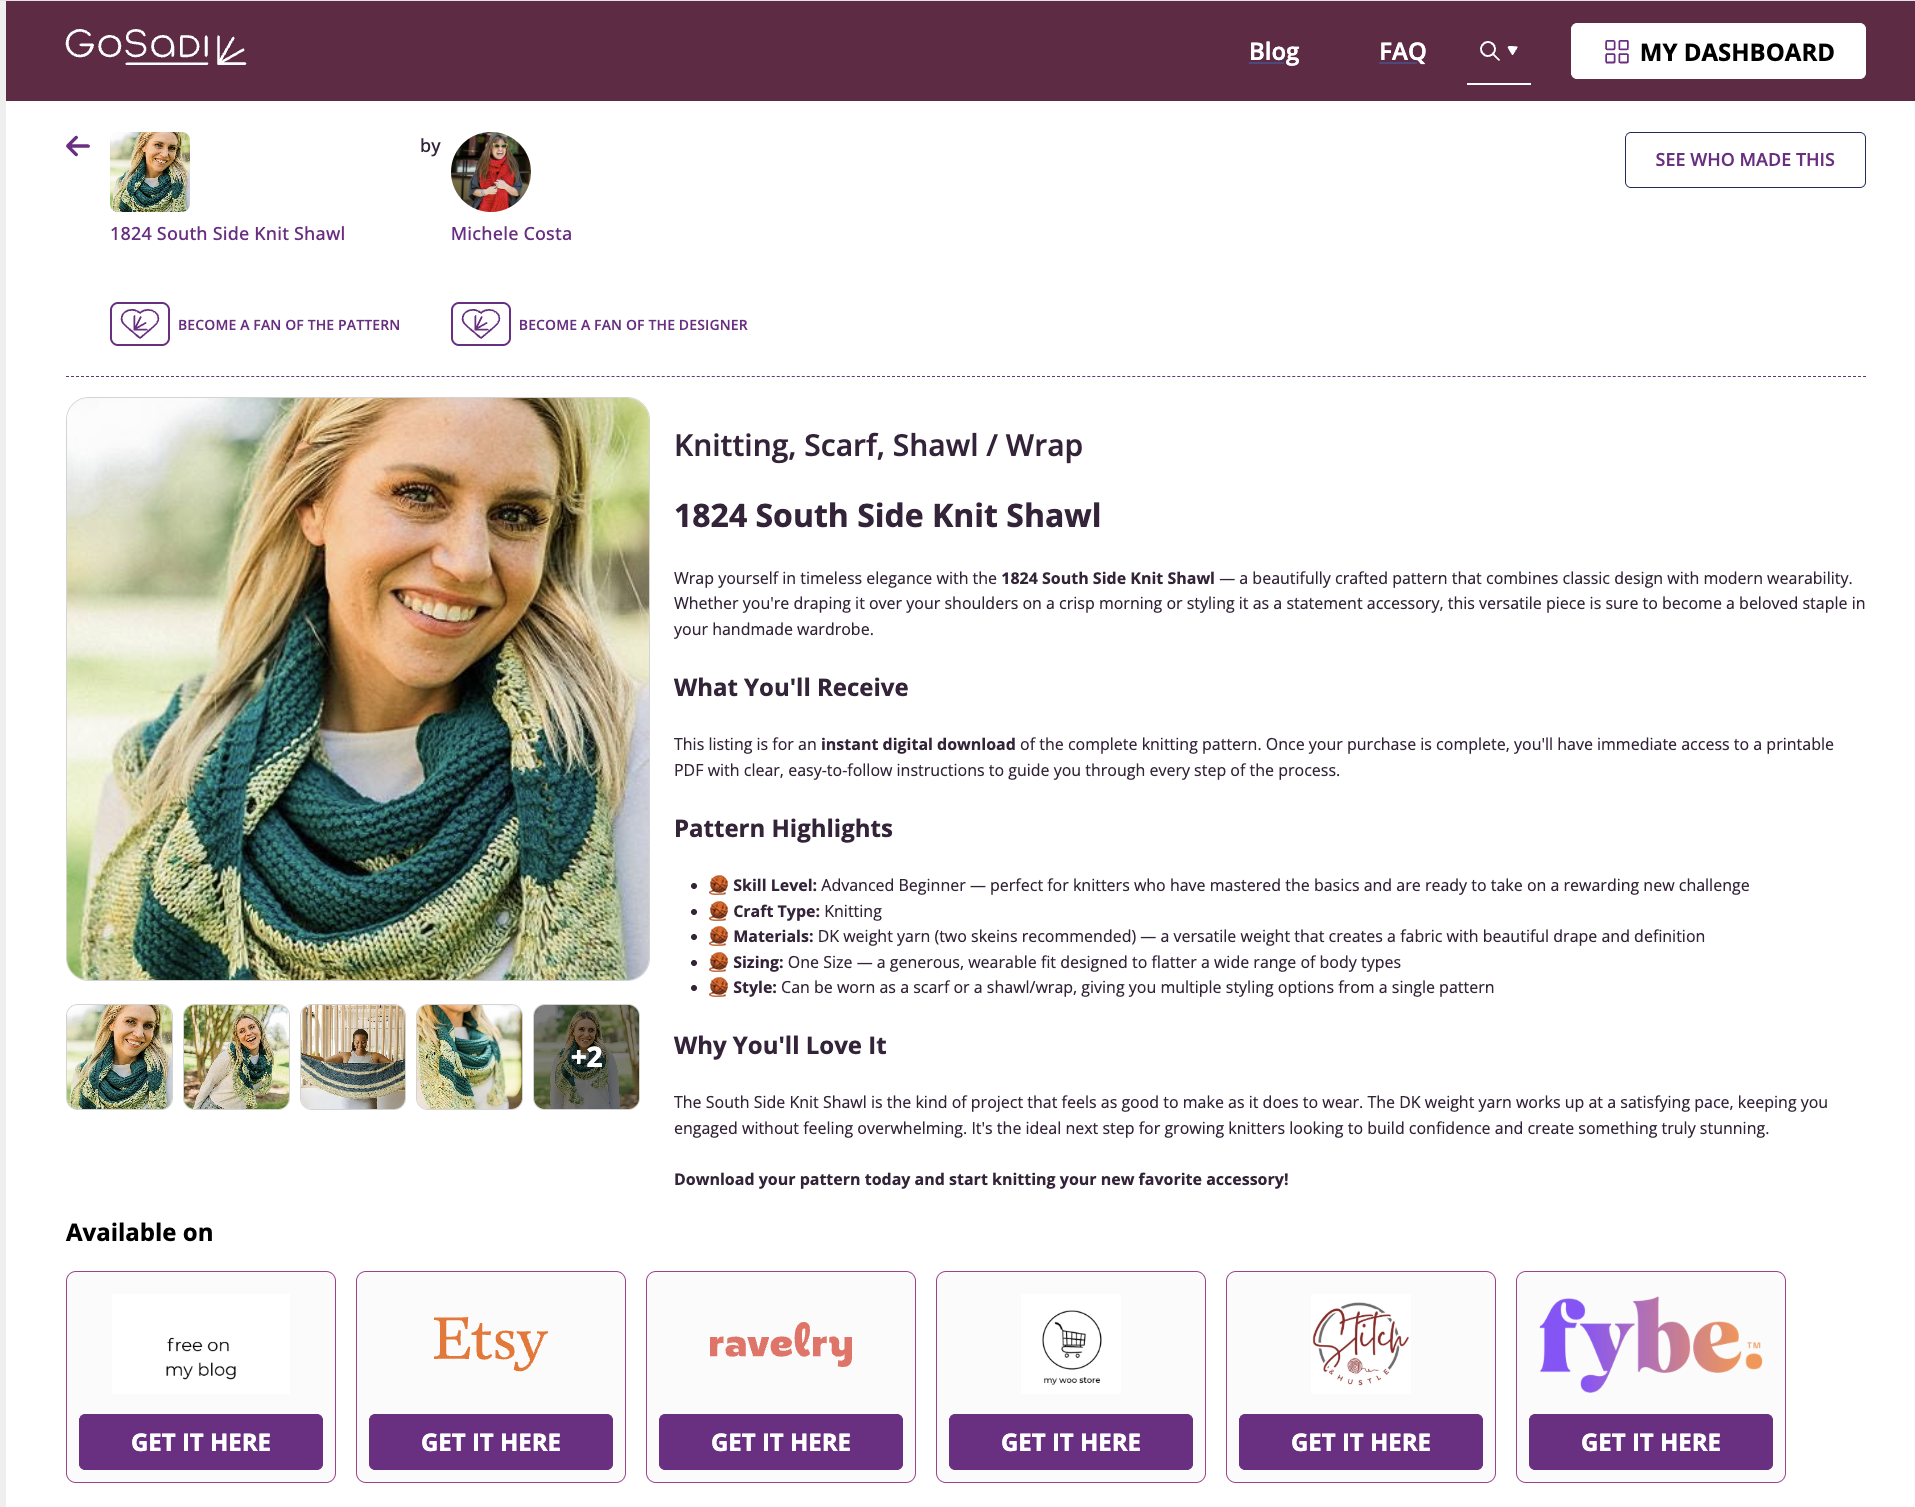
5. If you update the product, your changes will apply to that product for all Selling Channels if you sync the changes to all channels
Set Up Your DLP for Merged Patterns
When a pattern has a free version and paid versions, your Designer Landing Page helps customers see their options.
1. Go to your Designer Landing Page (DLP) Profile
2. Upload a logo for each version so customers know where to get it. For example:
a. Use your Shopify or Brand logo for the paid Shopify version
b. Use your Blog logo for the free blog version
3. Customers see every available option with a clear logo for each
Share Your Merged Pattern
When sharing your pattern with customers and community:
1. Copy the Product Link icon from your Product Library
2. Share that single link
3. Customers see all available options (free version, Etsy, Shopify, Ravelry, etc.)
4. They can choose where they want to purchase or access it
Find Patterns to Merge Automatically
You can also let GoSadi search for patterns that are ready to merge.
1. Go to Product Library
2. Click Merge Actions
3. Click Find Patterns to Merge
4. Select a pattern to merge, then return to the steps above starting with Resolve Conflicts and continue down the list until your merge is complete
GoSadi searches your library for patterns that can be merged. Review each match using the steps above.
To explore all the features and benefits that GoSadi has to offer, visit our website today!