Connecting & Importing From Selling Channels
With GoSadi, you can seamlessly connect your Selling Channels, import your designs, and efficiently manage all your channels from a single account. In this article, we will guide you through the process of connecting your Selling Channels to GoSadi and explain how you can effectively manage your design catalog.
What are Selling Channels
Selling Channels are ecommerce marketplace and platforms that allow designers to showcase and sell their designs. Platforms like Ravelry, Etsy, and Shopify offer tremendous revenue opportunities, especially if you can maximize efficient ways to use them. GoSadi allows Designers to connect to multiple Selling Channels at once, which means managing patterns all from one place.

Connect patterns to all Selling Channels from GoSadi.
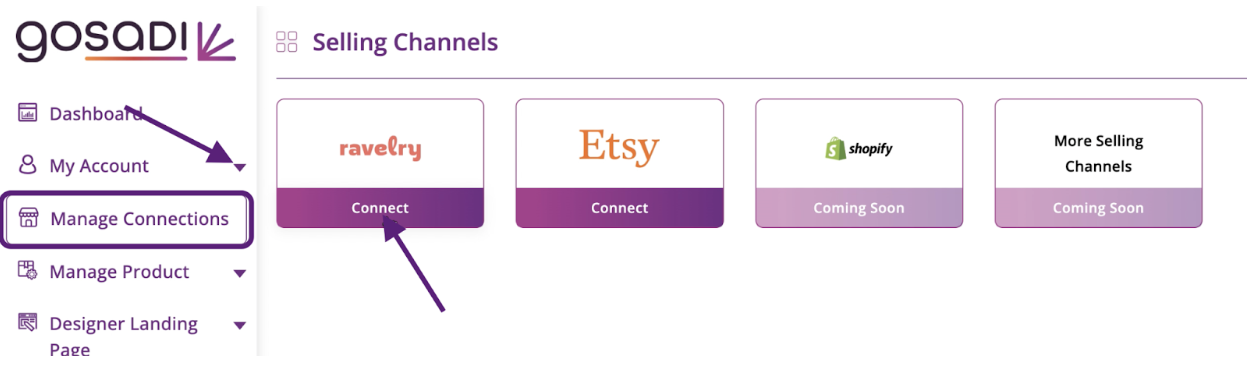
How do I connect my Selling Channels to GoSadi
Go to GoSadi and log in to your account.
Access the "Manage Connections" page from the left-hand side panel.
Connect your desired Selling Channel:
Click on the "Connect" button beneath the Selling Channel you want to sync with GoSadi.
Fill-in your credentials and complete the authorization prompts required by some Selling Channels (like Ravelry).
GoSadi automatically imports your patterns upon connection. You’ll receive an email confirmation
Connect to as many supported Selling Channels as you’d like.
Where can I locate my imported products
Once your designs are imported, you can find them in your Product Library. To locate a specific design, you can use the search filter or scroll through the list. For more information on utilizing the Product Library feature, refer to the Navigating the Product Library guide.

disconnect, re-connect, import new patterns, and re-import all patterns
Once you’re connected to Selling Channels, you have flexibility to manage them from GoSadi. You can disconnect from a channel, import the new patterns you’ve created in a channel, or re-import all patterns from a channel.

disconnect a selling channel
Click on the “Connect” bar at the bottom of the Selling Channel you’d like to disconnect.
From the drop-down, click “Disconnect” and confirm.
re-connect a selling channel
Click the “Disconnected” bar at the bottom of the Selling Channel you’d like to re-connect.
Click “Re-connect”.
Choose whether to Re-connect with or without importing patterns.
"re-Connect And Do Not Import"
This option allows you to re-connect to your Selling Channel without re-importing your designs from it. If you choose this option, you can later “Import new patterns” or “Re-import all patterns”.
"Connect and Import"
This option re-connects your Selling Channel and imports your designs into GoSadi. This way, you can update your designs in GoSadi and seamlessly push changes to your connected Selling Channel.
Choose to publish your patterns on the DLP on import. Remember, publishing to your DLP increases your chances that searchers will find you and your patterns.
import new products
Click the “Connected” bar at the bottom of the Selling Channel with the new products you’d like to import.
Confirm the new import.
Choose whether to publish to the DLP. Remember, publishing to your DLP increases your chances that searchers will find you and your patterns.
7. Import confirmation:
re-import all products
Click the “Connected” bar at the bottom of the Selling Channel with the products you’d like to import.
Confirm that you understand re-importing all products replaces the existing data you have in GoSadi. If that’s okay with you, click “Confirm”.
Choose whether to publish to the DLP. Remember, publishing to your DLP increases your chances that searchers will find you and your patterns.
Final Thoughts
Connecting and managing your Selling Channels through GoSadi provides a streamlined approach to expand your reach and boost your sales potential. By centralizing your inventory and enabling seamless updates, GoSadi empowers designers to focus on their craft while maximizing their online presence. So, connect your Selling Channels to GoSadi today and unlock the full potential of your designs. Happy selling!
To explore all the features and benefits that GoSadi has to offer, visit our website today!